Sunday, February 27, 2011

WARNING - Nekkid pictures ahead (of stained nails, lol)

Morning! Remember how I told you all that Nubar Verde was not very nice to me or my nails. Well I just wanted to show you guys how I semi fixed it. As you can see, I kind of already fixed my pointer, before I decided to take pics, and share with you all. You can still see the icky staining on the others. I hope I don't gross you guys out, lol.

Well using my square purple buffing block, I lightly buffed my nails, and most of the stains out. Now I don't recommend this if your nails are thin or weak, but mine are fairly strong, so just a tad light buffing, doesn't really damage them.

Collistar: Ombretto effetto satinato n°46


Collistar ombretto numero 46 effetto satinato, visto che è l'anno del grigio direi che questa tonalità è perfettamente in tema!


Ha una colorazione molto intensa ma non del tutto coprente quindi non resta "pesante".
Abbastanza facile da sfumare.
Un grigio molto scuro tendente quasi al nero, veramente molto bello.
Non è sicuramente una novità come colore ma è sempre attuale.

Adatto secondo me prettamente alla stagione invernale.


Friday, February 25, 2011

St. Patty Patchwork

Okay, so I'll take a break from the Crackles *sigh* lol. Well since St. Patricks Day is coming up, isn't it, and I have a brand new St. Patty's Day polish from Five Below, I figured I should do a green Patchwork mani. For this I used OPI Gargantuan Green Grape, Funky Fingers Erin & Sinful Black on Black.

I started with 3 coats of Gargantuan Green Grape, 3, yep you heard right 3 freaking coats, man I forgot how much of a PITA this was. Oh well.


Then I taped them off, and added the Funky Fingers Erin. Such a pretty sparkly green, which I can say, I don't own anything like it. I then added a coat of SV.


For my final color, I added my fave go to black from Sinful. and another coat of SV


 I am loving this soooo much!!!! If you are looking for a How-To on this, I have one posted up above in my 'Tutorials' tab.

Nail art di Carnevale: la regina delle nevi

E come non completare il look dell'algida regina delle nevi con una manicure a effetto ghiaccio?

Ecco allora una proposta...da brivido!

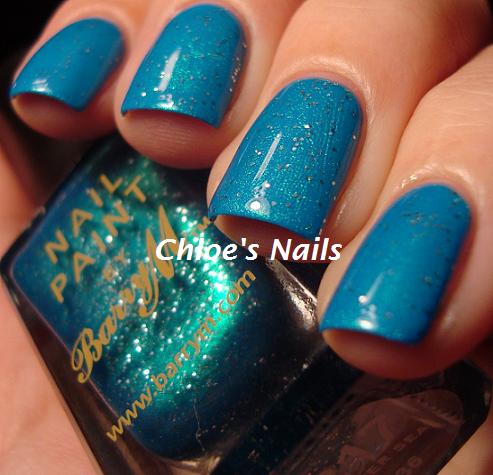
In questa manicure ho fatto la french con lo smalto glitter blu e su ogni unghia tre cristalli di ghiaccio di tre colori differenti: uno blu, uno bianco e uno sfumato. Seguite il tutorial per scoprire come realizzare una stampa sfumata con due colori!


Cosa ci occorre:


  • Smalti: Kiko 206 french manicure, China Glaze Dorothy who?
  • Smalti per stamping: Konad speciale bianco e blu
  • Disco per stamping: Konad m59
  • Top Coat: China Glaze Fairy Dust
  • timbrino e raschietto

Procedimento:


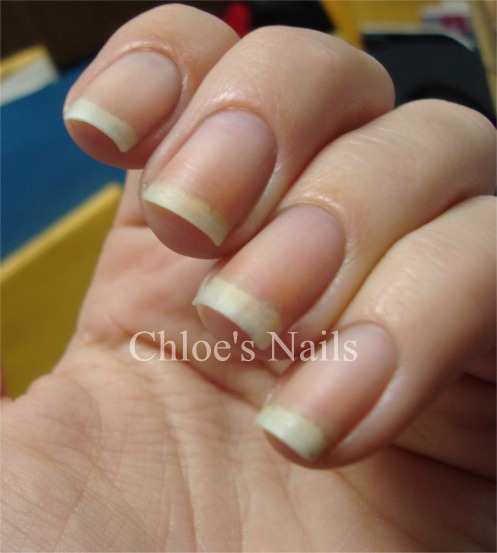
Passo 1: applico due passate di smalto chiaro per french manicure (le mie unghie al naturale sono molto brutte, non fateci caso!)


Passo 2: con lo smalto blu glitter coloro le lunette


Passo 3: con lo smalto speciale blu stampo vicino alla base un cristallo di ghiaccio blu


Passo 4: per realizzare il cristallo sfumato metto due gocce di smalto bianco e blu sul disegno da stampare


Passo 5: con il raschietto elimino l'eccesso di smalto DUE volte, in questo modo il colore si mischia e si sfuma. Stampo il disegno al centro delle unghie


Passo 6: con lo smalto speciale bianco stampo un fiocco verso il bordo libero. Come top coat uso un glitter multicolor finissimo


Thursday, February 24, 2011

Beautiful long nails


My New Barry M's with...yep more Crackle!!

So I received some Barry M polishes in my swap, and I have never used this brand before so I was so excited! I wish these were available in the US, but thanks to a new friend, Suzanne, I have my first 3! The third is the Barry M crackle, and I will be playing with that later on in the week. For this I started with Barry M, Cyan Blue. The formula on this was perfect!


Then I added Barry M, Silver Sea. I love this, it is very sheer, but has such pretty silver glitter bits in it!!


then because I just wanted to play, I added China Glaze Crushed Candy over top, but I didn't add a coat of SV.


Okay I promise to give you all a Crackle break after this, lol. I received my 2nd swap package and it contained some more amazing pretties that I can't wait to share with you all!!

Make up tutorial: Feline Smokey

Oggi un trucco facile facile e con pochi prodotti, look perfetto per la sera che allunga il nostro occhio (il mio è un pò tondo) e ne mette in evidenza il taglio.

Ho notato che con questo grigio il colore dei miei occhi verdi veniva molto esaltato!

Insomma, un risultato sexy con poco sforzo!


Cosa ci occorre:


  • Base: Benefit Lemon Aid
  • Ombretti: Kiko 20 nero matt e Catrice 06 Nude Beige matt
  • Eyeliner: ELF Cream Eyeliner black
  • Mascara: Cover Girl Lash Blast Luxe

Pennelli:
  • pennello da sfumatura
  • pennello a penna
  • pennello da eyeliner

Procedimento:


Passo 1: dopo aver steso la base opaca con le dita, applico l'eyeliner in crema con il pennello angolato, prolungo la linea verso l'esterno alto


Passo 2: fisso l'eyeliner in crema passandoci sopra l'ombretto nero


Passo 3: con il pennello da ombretto, applico il nero su tutta la palpebra


Passo 4: con il pennello da sfumatura pulito, sfumo l'ombretto nero. Sfumo un pò di ombretto nude matt sull'arcata


Passo 5: ripasso l'eyeliner in crema con il pennello angolato


Passo 6: sia all'interno che all'esterno eyeliner nero fissato con l'ombretto nero


Passo 7: tanto mascara nero e il look è finito!


Wednesday, February 23, 2011